

Are you running a blog, eCommerce store or any other business website then implementing a regular backup is most important for you? Because if your website having any issues like hacking, malware attack or any mess up then you can restore your website. Backing up your website is now too easy and free. In this article, we are writing about backup and restore your WordPress website.
2 Ways to Backup and Restore WordPress Website
You can backup and restore your WordPress website with 2 ways from the WordPress Dashboard (with Plugin) or cPanel. In this article, we will sum two methods to the backing and restoring the website. So, let’s start with the first method.
How to Backup and Restore WordPress with Plugin
Taking a Backup and restoring with a WordPress Plugin is much easy and free. You just have to install a Backup Plugin and then in one click you can backup your website and restore it. There are many backup plugins available. You can choose any of them with your choice. Read more about 5 Best Backup Plugin for WordPress website.
Video Tutorial
How to Backup with Updraft Plus
UpdraftPlus is a premium and most popular plugin in the WordPress Plugin directory. It is the world’s highest-ranking and free backup plugin for WordPress that has over 3 Million active installs. You can save your backup files on local and remote storage as well. Remote storage includes Google Drive, Dropbox, Amazon S3, Azure, FTP, email and many others.
You can also reset your WordPress website when it is needed.
Follow these 4 simple steps to backup and restore your WordPress website.
Step 1: Install UpdraftPlus on your WordPress Dashboard
First, you have to log in to your WordPress Dashboard and then install UpdraftPlus in your plugins list. You can download UpdraftPlus from here or from the WordPress directory.

Step 2: Choose your Remote Storage from Settings
After installing UpdraftPlus go its settings and choose your remote storage like Google Drive, Dropbox, Amazon S3 or another.
Save Changes and then you will find a pop-up that will ask you for Remote Storage Authentication.
After authentication your remote storage you will see a Complete Setup window in front of you.
Step 2: Backup Now
Click on the blue Backup Now button and check your options and click on backup now and your backup will start processing which takes some time.

After completing your backup, you will see a Complete Backup popup. Now you can see a list of existing Backup below.

Now when you have your backup file then you can restore it when it’s needed. Read more on how to take Backup with WPVivid.
Step 4: Restoring WordPress Backup
When you have your backup then you can restore it easily. Go to UpdraftPlus and find existing backup and click on the blue Restore button.
Choose your component to Restore and click on Next.
Updraft will download or retrieve your backup file. When all files are retrieved click on Restore.
Then UpdraftPlus will start its Restoration process that takes a few minutes.
After completion, you find to see a Restore Successful message.
Now you can delete your old directories. And you can see your posts, pages, themes, media and plugins are restored successfully.
You can use Jetpack Backup, WPVivid or Backup Buddy to backup and restore the WordPress website.
How to Backup and Restore WordPress with cPanel
You can also backup and restore your WordPress website file form your cPanel. So follow these steps to do so.
- Login to your Web Hosting cPanel
- Go to Backups
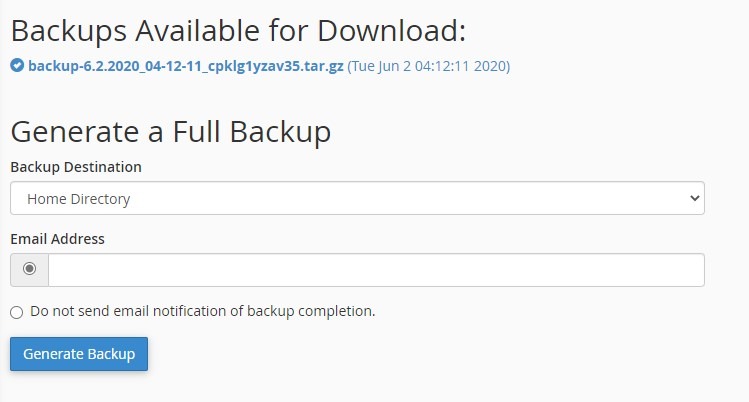
- Click on Download Full Backup
- Click on Generate Backup of your Home Directory.
Now you have your backup file, now you can easily restore it when it is needed. Follow these steps.
- Go to cPanel
- Click on Backups
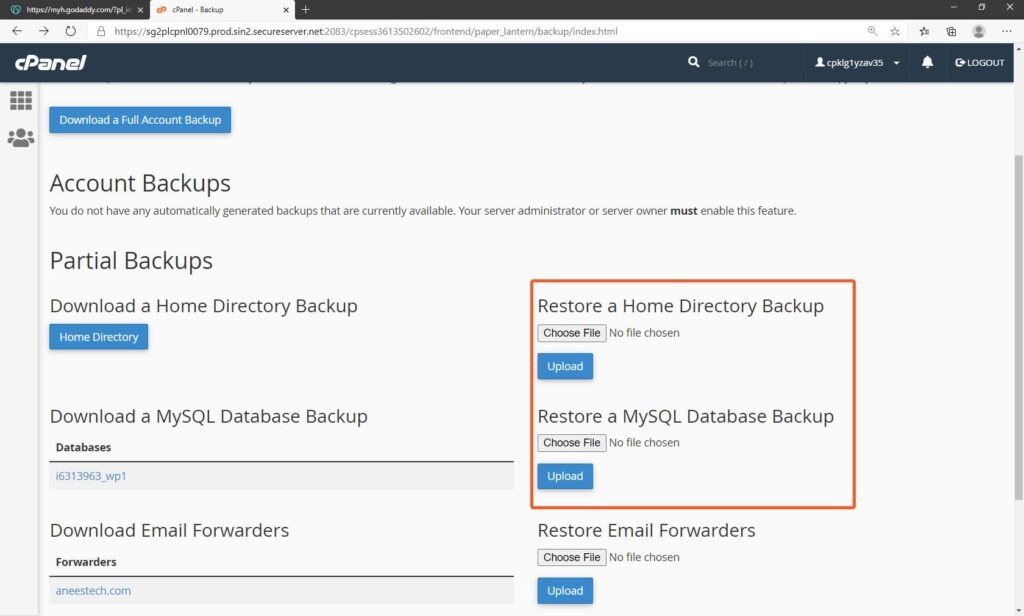
- Find Restore a Home Directory Backup
- Choose your Backup File and click Upload
Your backup file will restore in a few moments and you will get a complete message. Read full detail here.
Conclusion
So, in this article, we try to sum up how to backup and restore the WordPress website. You can do this with 2 methods. The first one is backing up from a WordPress Plugin and the second is using your cPanel. Both methods are easy to use and free.
Learn more about WordPress, GoDaddy and other How-to Trick here. Follow our Newsletter to get every trick in your email. Please provide your suggestion and feedback by Contact us. You can also like us on Facebook, Twitter, Instagram, YouTube and Pinterest.